Background
Additive manufacturing (AM) is an emerging technology that promises a host of improvements over conventional manufacturing methods; these advantages, however, come with unique risks, especially where the fatigue performance of the component must be understood. For example, AM parts can have naturally occurring flaws that would affect the apparent material properties, such as porosity, lack-of-fusion, warping, and delamination. Additionally, the surface finish of additively manufactured components is significantly rougher than conventionally manufactured components, which can affect fatigue life. It is typical for fatigue-critical components to be inspected using nondestructive evaluation (NDE) techniques, but these same AM challenges (e.g., unique flaws and rougher surfaces) may produce unanticipated changes in the NDE performance. The objective of this program was to investigate two of the most pressing topics related to NDE of AM components: 1) predicting the performance of eddy current testing (ECT) as a function of surface roughness and 2) developing a process to qualify AM parts based on their microstructural properties using high-accuracy ultrasonic testing (UT) measurements.
Approach
There are two separate technical efforts associated with this research program. First, to determine the influence of surface roughness on ECT inspections, test samples were fabricated with slightly different build parameters to induce various surface conditions. After adding reference features (i.e., notches) to each specimen, signal-to-noise ratio (SNR) measurements were collected using established ECT procedures, and the results were compared to surface profile measurements made using optical systems and X-ray computed tomography. This empirical data was compared with the theoretical signal change for surface roughness of conventionally manufactured techniques.
For the UT approach, additional test articles were produced with AM build parameters adjusted to intentionally induce poor microstructural characteristics, namely high porosity. Studies have shown that this damage type can be estimated using the ultrasonic longitudinal wave speed. SwRI explored whether other wave modes, namely different polarization of shear horizontal waves, would provide a more accurate estimation of porosity than is currently achievable. Additionally, the inclusion of shear wave measurements allows the possibility of estimating the elastic moduli; these estimates were compared with moduli estimates generated using tensile tests.

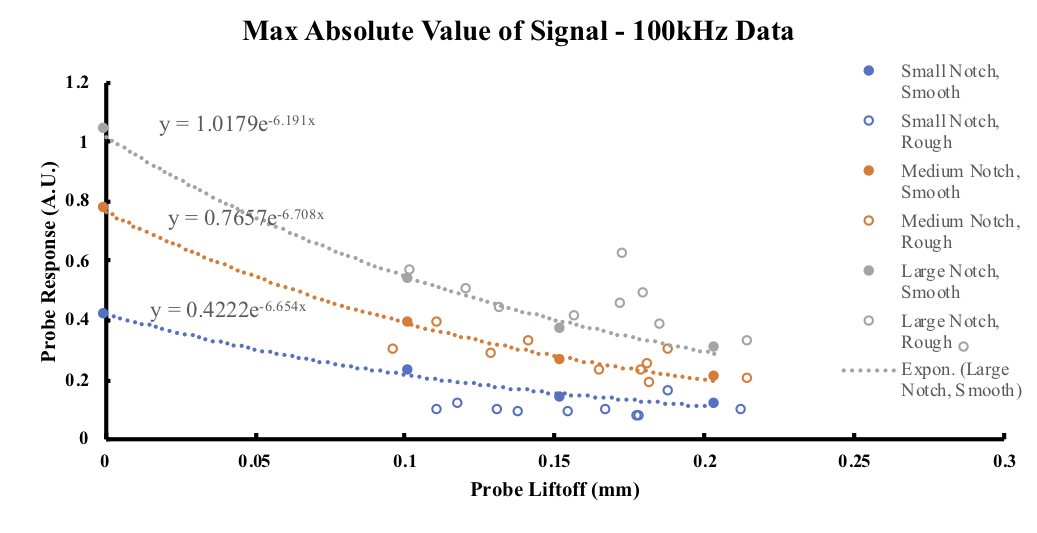
Figure 1: ECT probe response to artificial defects (notches) as a function of controlled liftoff at 0.0, 0.1, 0.15, and 0.2 mm on a smooth surface and effective liftoff calculated from AM-part measured surface roughness.
Accomplishments
AM specimen sets were designed and fabricated for both techniques. The ECT specimens had a variety of surface roughnesses obtained by adjusting the build angle in the machine, whereas the UT specimens had different porosity levels through adjustments of the energy density provided by the laser. These specimens were characterized with numerous nondestructive and destructive tests. ECT measurements were made with commercially available transducers. Analysis revealed that the standard model for the effects of surface roughness on ECT signals, which is an increase in the background noise, did not agree with the data collected.
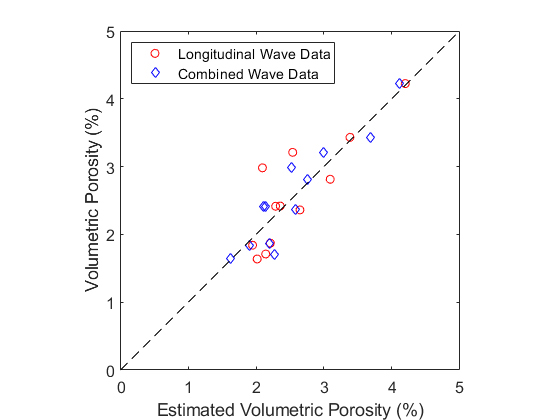
Further analysis of the specimens revealed that while the surfaces were rough, the character of the roughness was different from standard machined surfaces. The AM surfaces examined here had narrow, columnar features that increased the probe liftoff from the solid surface. Thus, a more appropriate model for surface roughness effects for AM parts was a sensor liftoff model that reduces signal amplitude instead of an increase in the background noise. This model was tested by acquiring ECT data from defects at different values of liftoff and comparing the results to the effective standoff created by the rough surfaces. The results are shown in Figure 1. UT data were collected on the associated specimens using custom-built transducers. It was confirmed that the longitudinal wave velocity is correlated with an increase in porosity. Moreover, shear wave measurements were shown to have similar dependency on the porosity level. A novel regression-based technique was developed that used both shear and longitudinal wave measurements to more accurately estimate the porosity level in the material, as shown in Figure 2. Additionally, moduli values derived with the acoustic wave speed measured based on standard isotropic material models agreed with moduli value measurements obtained using tensile tests.

Figure 2: Comparison of volumetric porosity estimates derived from either longitudinal wave speed information alone or using a combination of multiple wave speed values with the true volumetric porosity value determined using X-ray computed tomography. Note that the differences between the estimated and true values are less when multiple wave speed values are used.
